Tuesday, July 31, 2012

Sriarcha White Bean Dip

This week at the farmer's market I bought a watermelon. After I got it home, I immediately went to work with my melon baller. I don't know about you, but I think any type of melon tastes best when in perfect bite-sized balls. It may take little more patience and time than simply chopping up the watermelon, but it is worth it in my book. After the task was completed, I was left with an overflowing bowl of juicy red goodness (in one of my largest bowls that could no longer be closed with its lid). Needless to say, I've been eating lots of watermelon since Saturday. And it tastes just like summer!


Speaking of summer, can you believe that it is the last day of July!?!?! It feels like I just moved to IL but I've been here for more than six months?!?! 

Oh my goodness <<shakes head>> 

Realizing how "long" I've been here makes me start to think of what's going to happen next. Please keep a look out for job postings for organic chemistry professors for me, ok? The application process is speedily approaching. And no matter what we do, time doesn't slow for anything.


Completely unrelated to job searching, but related once again to summer foods, is a pita pocket stuffed with lots of fresh veggies like cucumber, spinach and tomato. Of course, you will need some sort of a "dressing" for this sandwich. My suggestion this spicy bean dip. It is kinda like an Asian inspired hummus. No tahini so I don't think we can technically call it a hummus, but it is still pureed beans. The sriarcha gives it a nice kick and the flavors are rounded out with curry powder, soy sauce and lime juice. It was a great compliment to my pita, but I also enjoyed it by the scoopful on top of multigrain Tosititos scoops and assorted vegetables.  


Sriarcha White Bean Dip (adapted from White on Rice Couple)
Ingredients:
1 cup cooked Northern beans (or 2/3 15 oz can, rinsed)
1 tbsp extra virgin olive oil
1/2 tsp sesame oil
2 tsp soy sauce
1 1/2 tbsp sriracha sauce
1 glove of garlic
1/2 tsp curry powder
1/4 cup water, plus more if necessary
juice of 1/2 lime

Directions:
Combine all ingredients in a food processor. Pulse until desired consistency is reached.

Serve with crackers or tortilla chips. Or use as a spread for a sandwich or pita full of veggies and shredded cheese.


Monday, July 30, 2012

Cadbury Creme Egg Brownies

Does any agree that somehow Cadbury has the best chocolate ever? I mean, it completes blow Hershey's out of the water. I spent a month in South Africa when I was in college and Cadbury was the main chocolate we survived on (especially when we were sick of super fatty lamb and pureed pumpkin). However, Cadbury is not seen as prominently on the shelves in the US. The one exception is Easter time when the grocery stores are chalked full of the creme eggs and mini-eggs. 

My fav are the mini-eggs. Like most things, I have no self-control when it comes to eating them and you can be guaranteed that a bag of the mini-eggs will not last longer than a week in my apartment. 

Scott's fav is the creme egg. So when I came across this recipe inspired by the creme egg, I knew I had to make it for him. I made him guess what inspired the brownies and he knew right away! And, no joke, they taste very close to the original eggs. I am a little hesitant to call them "brownies" as we both determined that they tasted more like a fudge. But boy were they yummy! Super rich and delicious. :)

Get your Cadbury creme egg fix anytime of the year!!


Cadbury Creme Egg Brownies (adapted from Love and Olive Oil)
Ingredients:
Brownie layer:
2/3 cup flour
2 tbsp unsweetened cocoa powder
dash of salt
6 ounces milk chocolate chips
1 stick unsalted butter, cut into cubes
1/4 cup sugar
1/2 cup brown sugar, packed
2 large eggs, at room temperature, lightly beaten
1 tsp vanilla extract

Cream layer:
1/4 cup light corn syrup
2 tbsp unsalted butter, at room temperature
1/2 tsp vanilla extract
dash of salt
1 1/2 cups powdered sugar
yellow food coloring

Chocolate layer:
3 ounces milk chocolate chips
2 tbsp unsalted butter, at room temperature, cut into cubes

Directions:
Preheat oven to 350 F.

Line the bottom and sides of a 8x8-in pan with parchment paper, leaving overhang on the edges.

Make the brownie layer first: Mix together the flour, cocoa and salt in a small bowl. Melt the chocolate and butter in a large bowl set over simmering water. Stir until smooth. Remove from heat and whisk in the sugars. Stir until dissolved and the mixture has cooled slightly. Whisk in the eggs and vanilla extract until combine. Sprinkle in flour mixture and fold in until incorporated. Pour into prepared pan. Baked for 25-30 minutes, until a toothpick inserted into the middle comes out clean. Allow brownies to cool completely.

Make the cream filling next: Using a hand mixer, beat together the corn syrup, butter, vanilla and salt on medium-high until smooth. Beat in the powdered sugar, a little at a time, until all has been added and the mixture was creamy. Spread 3/4 of the cream mixture on top of the cooled brownies. Add a drop of yellow food coloring to the remaining mixture and stir until evenly colored. Spread over the white layer. Refrigerate for at least 2 hours, until set.

Make the chocolate layer: Set a small bowl over gently simmering water. Melt the chocolate and butter and stir until smooth. Pour over the cream layer and spread into a thin, even layer. Refrigerate until set, at least 30 minutes.

Remove the brownies from the pan using the parchment paper edges. Cut into squares using a sharp knife.


Sunday, July 29, 2012

Stuffed Buffalo Chicken Breasts

I'm not sure I've told you about my obsession with everything buffalo flavored. Whenever I'm at a new restaurant, my eyes (and stomach) are automatically attracted to a buffalo chicken sandwich or salad or something equivalent. Currently my fridge is home to 2 open bottles of buffalo sauce.

Scott is also a fan of buffalo chicken. He is a little weird, however, because for some reason he doesn't like blue cheese. For me, and so many others, these two flavors go hand-in-hand. So, when I can across this stuffed buffalo chicken breasts on one of food blogs I read regularly, I knew it would be a perfect recipe to make when Scott was visiting. Because of his aversion to blue cheese, I substituted Swiss cheese, but you could definitely go more traditional with the blue cheese. I'm certain it would be great.

This recipe is fairly easy and quite delicious for those buffalo-aphiles like Scott and me. :)


Stuffed Buffalo Chicken Breasts (adapted from Skinny Taste)
Ingredients:
1 large chicken breast, cut in half and pounded thinly
1/8 cup shredded cheddar cheese
2 wedges of light Laughing Cow Swiss cheese
1/4 cup minced celery
1/8 cup minced green onion
1/4 cup minced carrot
salt and pepper, to taste
8 saltine crackers, crushed
1/2 tbsp light mayo
4 tbsp buffalo sauce (I used Frank's buffalo sauce)
1 tsp butter, melted
1/2 tsp garlic powder
cooking spray

Directions:
Preheat oven to 400 F. Spray a baking dish with cooking spray.

Combine the cheeses, celery, onion, carrot, salt and pepper in a small bowl.

Lay out the chicken breast halves and split the mixture evenly between the two spreading out through the center. Roll the chicken, starting with one of the skinnier sides, to encase the filling and secure with 2 toothpicks each.

Place the cracker crumbs in a shallow dish. Combine the mayo and 1 tbsp buffalo sauce in another shallow dish. Working one at a time, roll the chicken in the buffalo sauce mixture followed by the cracker crumbs. Place seam down in the prepared baking dish. Spray the top of the chicken with cooking spray.

Bake 30-35 minutes until the chicken is cooked through.

Combine the remaining 3 tbsp of buffalo sauce with the butter and garlic powder. Drizzle over the chicken breast and serve.


Saturday, July 28, 2012

Guacamole

I'm not one of those people that has a go-to guacamole recipe. Like with many things that I make, I simply go with whatever I have in the fridge and pantry. Sometimes I'll pick up those guac seasoning packets from the store and mix it with the mashed avocado and a little bit of tomato. However, as with store-bought taco seasoning, the packets are full of sodium and do not really allow you to adapt the size of your dish. And because avocados don't last long once you open them up, it is always better to make only what you will eat in a day or two.

Did you ever wonder why your guacamole turns brown so soon after making it? It's all about the science! Fruits contain an enzyme called polyphenol oxidase is capable of oxidizing the phenols in the fruit when exposed to oxygen in the air. The oxidases can be inhibited (stopped from doing their function) temporarily by the addition of acid such as lime juice. Alternatively, if you store the pit of the avocado (see picture below) in an air-tight container with the guacamole, it will consume the oxygen in the bowl and prevent browning. Since there are a large number of these enzymes within the fruit, these things are only temporary fixes and without a doubt eventually the green color will turn to brown. Don't ask what they do to the guacamole in grocery stores to keep it a fluorescent green color; I don't wanna know.

Anyway, this is the guacamole, Scott and I whipped up for the fajitas last weekend. It was quite flavorful and delicious and I would definitely recommend it.


Guacamole
Ingredients:
1 large avocado
10 grape tomatoes, halved
1 tbsp parsley, chopped
juice of 1/2 lime
1 tsp ground cumin
salt and pepper, to taste

Directions:
Mash the avocado in a bowl. Add the tomatoes, parsley, lime juice and cumin and mix. Season with salt and pepper to taste. Refrigerate, covered with the pit, until ready to serve. 

Makes approximately 1.5 cups.


P.S. Thanks for sitting through the science lesson :)

Wednesday, July 25, 2012

Homemade Salsa

Salsa may be one of my favorite foods.

I love the salsa that you get at Mexican restaurants as soon as you sit down. I like the large jugs of Pace salsa that accompany departmental events and parties. I prefer the fresh salsa you can pick up from the vegetable section of the grocery store. And, no surprise I'm sure, I really enjoy making homemade salsa.

I love that you can make just about any fruit and vegetable into a "salsa". Take for example the cucumber and mango salsas that I've already shared with you. Just chop your ingredients up and serve them atop some crispy tortilla chips or as a garnish for a burger or fish and you've successfully created a "salsa". Of course, some meals, like our steak fajitas, call for a more traditional salsa-- tomatoes, onions and jalapenos. Simple enough. I always add a little bit of red wine vinegar and lime juice to deepen the flavor and give some more acidity to the tomatoes. Depending on how acidic your tomatoes are, you may need to adjust the flavors to your own taste. Feel free to add cilantro, if you can stomach the flavor, as that is typically found in salsa as well. Me, I skip it... just the beauty of flexibility when creating recipes at home.


Homemade Salsa
Ingredients:
4 roma tomatoes, cut into quarters
1 small onion, cut into large chunks
1-2 garlic cloves
1 jalapeno pepper, cut into quarters (seeded if desired)
juice of 1/2 lime
3 tbsp red wine vinegar
2 tsp kosher salt
1 tsp freshly ground pepper

Directions:
Combine tomatoes, onion, jalapeno and garlic in a food processor. Pulse until finely chopped. Add lime juice, red wine vinegar, salt and pepper. Pulse until the desired consistency is reached. Season with additional salt and pepper, if desired. Chill until ready to serve.

Makes approximately 4 cups.


Monday, July 23, 2012

Mexican Beer Steak Fajitas

Ok, y'all, I had a great birthday weekend. Scott came to visit and despite the fact that he wanted to take me out for a nice dinner, I convinced him that it was really more of a birthday treat for me to spend the weekend cooking meals for us. It didn't really take a lot of arm-twisting on my part because he eats out A LOT now that I've moved away so home-cooked meals are a treat for him as well. Let me tell you, cooking for other people is one of my love languages (for those of you who have read "The Five Languages of Love", you are probably about to start arguing with me that cooking is not technically a love language. I know, I know, but go with me, I'm taking creative license on MY blog. Deal. :) ).

Now I'm excited to share with you the meals we enjoyed this weekend. On Saturday late afternoon, after we spent a bit of the day at the pool, we had a Mexican feast revolving around these steak fajitas. I marinated the steak in beer before hand. I had been planning on using Corona but then Meijer had a mix-pack of Mexican beers for sale last week. So, I picked Dos Equis instead. Totally turned out great. And to make things even more enticing, the cooking part is soooo fast and easy.

You should try it. :)

And wait until you see the homemade salsa and guac we had with it. Stay tuned.


Mexican Beer Steak Fajitas
Ingredients:
3/4 lb top loin steak, cut into 1/4 inch thick strips
1 bottle of Mexican beer (I used Dos Equis, but Corona would work well I'm sure)
juice of 1/2 lime
3 cloves of garlic
2 cups of bell pepper, sliced thinly (any combination of colors)
3/4 cup onion, sliced thinly
1/2 tbsp canola oil
1 tbsp freshly ground pepper (more or less to taste)
salt, to taste
flour tortillas
sour cream and shredded cheese, for serving

Directions:
Between 12-24 hours before you are cooking the fajitas, combine the steak strips with the beer, lime juice and garlic cloves in a large bowl or marinade container. Chill in fridge for 12-24 hours, stirring or flipping at least 2-3 times throughout.

Heat the oil in a large skillet (or wok) over medium-high heat. Using tongs add the steak and garlic to the skillet and season with the freshly ground pepper; cook until the steak is browned through, approximately 5-6 minutes, stirring a lot. Remove the steak to a plate and discard the garlic. You should still have a little bit of liquid in the pan that cooked off of the steak. Add the peppers and onion and cook with stirring approximately 4-5 minutes. You want to still have some crisp to the peppers. Add the steak back to the pan and season with salt.

Serve divided among flour tortillas garnished with sour cream and shredded cheese, as desired.


Thursday, July 19, 2012

Italian Sausage Stuffed Zucchini

This week on "You Know You're Old When":

You know you're old when you ask for a vacuum cleaner for your birthday. You know you're old when you are excited that you get a beautiful Dyson Ball. You know you're old when you're happy after you've spent an evening putting said vacuum cleaner together and giving it a test run around the apartment.

I almost took a picture of the amount of dirt and hair picked up from around my apartment by the super-vac, but then I thought I probably shouldn't disgust you before I showed some yummy food. I'm not kidding you, it was grrrroooosss! I've known that my old vacuum has been pushing my hair into piles that I get to pick up by hand for a while now, but I didn't quite realize the suck-y sucking power. So, now my apartment (the floor, at least) is clean and beautiful.


Come on over.


I'll make you dinner.


How does stuffed zucchini sound?


It is summer squash time (at the stores and at the farmer's market) and I'm loving it. I could (and do) eat zucchini and yellow squash plain, dipped in ranch dressing, sauteed, stir fried, baked, etc. And certainly, when I find a big zucchini, I can't resist hollowing it out and stuffing it with delicious goodness. Here, I used sweet Italian sausage, green peppers, and tomato sauce sprinkled with parmesan cheese. However, as with so many of my recipes, feel free to get creative and do what you like. The zucchini is your canvas for our culinary art.


Italian Sausage Stuffed Zucchini
Ingredients:
1 large zucchini, cut in half
1/4 lb Italian sausage (mild or spicy depending on your taste)
1 clove garlic, minced
1/8 cup chopped onion
1/8 cup chopped green peppers
1/2 cup tomato sauce
1 tbsp tomato paste
1 tsp dried oregano
1 tsp dried basil
1 tsp dried parsley
salt and pepper, to taste
2 tbsp grated parmesan cheese

Directions:
Preheat the oven to 350 F.

Hollow out the zucchini halves using a small pairing knife and spoon to remove the seeds and some of the flesh. Chop up about 1/3 of the zucchini "insides" for stuffing.

Cook the sausage over med heat in a skillet, approximately 3-4 minutes breaking into pieces. Add the garlic and onion and cook until the meat is completely browned, about 3-4 minutes more. Add the green pepper, seasonings and tomato paste and mix completely. Add the tomato sauce and heat approximately 2 minutes. Add the zucchini insides to the pan.

Place the hallowed zucchini halves in a baking dish. Scoop the sausage mixture into the halves (it is okay if they mound over the edges a bit). Sprinkle each half with 1 tbsp parmesan cheese. Bake for 15-20 minutes until everything is hot and the zucchini is slightly soft.

Serves 1-2 (depending on your appetite and the size of your "large" zucchini!)


P.S. If you come over for dinner, please don't spill this on the carpet. My new vacuum is great, but I'm not sure it would pick up tomato sauce stains.

Tuesday, July 17, 2012

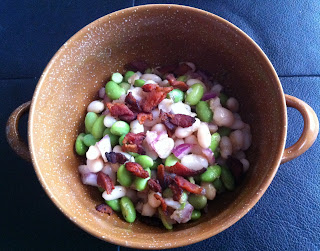
White Bean Edamame Salad

Hey there hot weather. I missed you dearly for that one week that you decided to leave IL. Now here you are back in full force. Welcome. (note: a slight hint of sarcasm)

Actually, hot weather doesn't bother me too much because I spend my days in an (over)air-conditioned building. The biggest issue is the walk to and from my car in my jeans and tennis shoes. That said, if you want a bowl of summer-y goodness, you have come to the right place. The white beans and edamame are hearty but light. The tang of the red onion mixed with the red wine vinegar and honey makes the flavor delectable. Plus, don't forget the bacon. The bacon threatens to make this a meal in and of itself, or a perfect side dish for a picnic at the beach (or pool or backyard or etc).

If you want to adapt it for a vegetarian or vegan diet, just substitute some olive oil for the bacon grease and omit the bacon crumbles. However, I wouldn't suggest it... this recipe is perfect and doesn't require tweaking. :)


White Bean Edamame Salad (adapted from A Spicy Perspective)
Ingredients:
1 1/2 cups cooked Northern Beans (or 15 oz can, drained and rinsed)
1 cup frozen edamame, thawed
1/2 cup chopped red onion
3 pieces bacon (plus + 1 tbsp bacon grease after cooked)
1 tbsp red wine vinegar
1 tbsp honey
1 tbsp dried parsley (or 3 tbsp of chopped fresh parsley)
1/4 tsp paprika
dash of salt and pepper

Directions:
Using kitchen shears, cut the bacon into small pieces. Cook in a skillet over medium heat, stirring occasionally until crispy. Using a slotted spoon, transfer the bacon to a small bowl lined with paper towels to soak up grease.

Combine 1 tbsp of bacon grease, red wine vinegar, honey, parsley, paprika, salt and pepper in a small bowl. Whisk to mix thoroughly.

In a larger bowl, combine the beans, edamame and onion. Drizzle with the dressing and toss to mix. Chill in fridge until ready to serve. Top with bacon before serving.

Note: You can add the bacon before you chill the salad, but it will get a little soggy from the dressing. Still tastes good, but at least the first time around you may want crispy bacon. Leftovers with soggy bacon are still great :)


Monday, July 16, 2012

Cucumber Ranch Dressing

10 years.


That's how long it has been since I graduated from high school. It seems not too long ago when I was spending hours at pom practice in Eyeball alley (don't ask) or marching in the parking lot for band practice until the late hours on Wednesday evenings in the fall. There were countless hours on the golf course in the spring hitting multiple balls in the woods and, of course, sinking those 30 foot putts to birdie a hole and beat our cross town rivals. There are many memories of classes, teachers, dances, parties, and so on. And although it doesn't seem that long ago, it also seems that it has been a lifetime. I've spent nine and a half years in higher education and am currently living in my third new city. I've grown so much and changed significantly over the past 10 years.

Why the walk down memory lane? Well, I was back in my hometown this past weekend for my high school reunion. I had a blast catching up with folks and seeing how everyone is doing. We had a very nice turnout at the events and from how it appeared, most everyone seemed to have fun. Isn't it funny how you can not see someone for 10 years (or 5 or 1 or so on) and when you get together, you can fall back into a comfortable conversation? I love that. I may not be your best friend, I may not talk to you once a week, but know that I care and am genuinely glad to hear about your life.


Ok, ok, sorry about the side wanderings unrelated to food. Let's get back to the topic at hand. After a weekend of driving (and necessitating fast food meals) and some beer drinking, I needed a fresh and cleansing meal. How about a nice chopped salad with homemade cucumber ranch dressing? For me, the more things you throw into a salad, the better it gets. I typically clean out the vegetable crisper, chop everything up, mix it, and enjoy. This cucumber ranch dressing is excellent to bring it all together and super easy to make... plus it is better for you then what you would buy in a grocery store isle. Homemade dressings should not be daunting, try it out and let me know how you feel!


Cucumber Ranch Dressing (adapted slightly from Skinny Taste)
Ingredients:
1/2 cup low-fat buttermilk
1/4 cup light mayo
1/4 cup fat free plain Greek yogurt
1/2 large cucumber, peeled, seeds removed and coarsely chopped
1 tbsp dried parsley (or 3 tbsp fresh parsley)
1/4 cup scallions (mostly green parts with some white)
1 clove garlic
juice of 1/2 lemon
1/8 tsp garlic powder
salt and pepper, to taste

Directions:
Combine the cucumber, scallions and garlic in a food processor. Pulse until finely chopped. Add the buttermilk, mayo, yogurt and lemon juice and pulse until almost smooth. Finally, add the parsley, garlic powder and salt and pepper and pulse to mix completely. Keep refrigerated for up to a week.


Thursday, July 12, 2012

Overnight Oats with Chia Seeds

Ch-ch-ch-chia!

Did you have a chia pet when they were sweeping the nation in the 80s? I find them a little creepy but kinda cool. Know what I mean?

Well, chia is back, repurposed and sweeping the (health food) nation again. You heard me right, the same thing that made those funny animals (and characters) is something you can eat. Actually, it is the seed that has gained a lot of popularity recently. The seed is chalked full of fiber and many essential nutrients. If you haven't seen them, they are this little black balls that are very crunchy. They swell up when they are soaked in liquid and become soft.

After reading numerous blog posts and articles about this little seeds, I decided to try them out and make my own decision. Conclusion- I like them. I have just let them soak up in a glass of juice (you really can't tell you are drinking seeds along with it). I also tried them out in this overnight oats recipe. Overnight oats are great because you can mix everything up before you go to bed and your breakfast is waiting for you when you get up in the morning. If you are not a big fan of bananas, I would suggest skipping the banana because it is definitely the dominant flavor. I used coconut milk to make mine, but any type of milk would work great. Play around with the fruits to get something you really enjoy. It will brighten up your breakfast and hopefully get you energized for a productive day.


Overnight Oats (adapted from Skinny Taste)
Ingredients:
1/2 cup milk (cow's, almond, soy, coconut, etc)
1/4 cup old fashioned oats
1/4 medium banana, sliced thinly
1/2 tbsp chia seeds
1/2 cup blueberries
1 tsp honey (or other sweetener of choice)
dash of cinnamon

Directions:
Mix everything in a jar or glass. Cover and refrigerate overnight.


Tuesday, July 10, 2012

Baked Ravioli

I had forgotten that in the Midwest, summer not only means high temperatures and heavy humidity but orange cones littered on every road. On Monday, my normal route to work was blocked because they are working on some railroads tracks, so I had to make a detour through a residential area and weave back and forth through the blocks to get to my parking lot. Today I thought I'd be smart and take a different route altogether into campus. On this route I pass, kid you not, 5 different sites of construction where two lanes merge into one. Of course, there is only a construction crew on one of the sites, but the others have the road torn up and are causing significant backups. So this week I'm 2/2 in late starts for work due to those blasted orange cones.


Okay, enough complaining. I guess I really should be happy because the temperatures are back to double digits and that means I can use my oven again. I've been trying to avoid it because my air conditioner has been working hard enough keeping the warmth from outside away.

I tend to have raviolis in my freezer for days that I need a quick and easy dinner without much thought. This recipe, however, takes the frozen ravioli from okay to gourmet (well, maybe not gourmet, but at least a suitable appetizer from a nice Italian restaurant). They are crunchy on the outside and full of melt-y cheese on the inside. I'm warning you now--- try super hard to let them cool for five minutes before you bite into them. If you don't, you may end up with a burned mouth (just like me :) ).


Baked Ravioli (adapted from How Sweet it is)
Ingredients:
10-15 frozen cheese raviolis
3 tbsp egg white substitute (or 1 egg white)
1/8 cup whole wheat flour
1 cup panko breadcrumbs
1/4 cup breadcrumbs
1 1/2 tbsp shredded parmesan cheese
2 tsp dried parsley
2 tsp dried oregano
1 tsp dried basil
1/2 tsp garlic salt
one pinch each of salt and pepper
Marinara sauce, for dipping

Directions:
Preheat oven to 450 F. Place a wire rack on a baking sheet covered with aluminum foil. Spray with cooking spray.

Beat egg white substitute in a bowl until fluffy. Combine the flour, panko, breadcrumbs, cheese and seasonings in a shallow bowl and mix.

Bring a pot of water to a boil and then add the raviolis. Boil for approximately 2 minutes (about half the recommended time on the package), and drain. Dump the raviolis into the bowl with the egg white and toss to coat. One at a time, remove the ravioli from the egg whites and dip into the breading, pressing to adhere. Place the ravioli on the wire rack. Spray the tops of the ravioli with cooking spray.

Bake for 15 minutes, until crispy. Don't worry they will most likely puff up a bit in the oven.

Serve with marinara sauce for dipping.


Thursday, July 5, 2012

Parmesan Tilapia with Mango Salsa

Does anyone else feel like putting a holiday in the middle of the week really screws with your work schedule? I've been feeling like it is a Monday all day and my productivity has not been the best. I've also been dreaming of the pool at my apartment complex and the strawberry daiquiri I made with dinner last night. To tell you the truth, I think this 4th of July was the first one in a long time that I didn't go in to work. As a grad student, you don't really "get holidays"; you kinda just take off time when you need to and spend the rest of your hours in lab. But now that I've moved on to bigger and better things, I figured I could take the day off. :) However, my science may be regretting that... ha ha.

Anyway, here's a quick and easy tilapia (or any other non-strongly flavored white fish like cod or pollock) recipe for a summer evening. The mango salsa is super yummy and could certainly be eaten atop some tortilla chips.


Parmesan Crusted Tilapia with Mango Salsa
Ingredients:
2 4-oz tilapia fillets, thawed
1/4 cup cornmeal
1/4 cup flour (I used whole wheat)
1 egg white, beaten
2 tbsp grated parmesan cheese
1/2 mango, diced
1/2 cup diced onion
1/2 jalapeno, seeded and diced (more or less to taste)
1 tsp honey
1 tbsp apple cider vinegar
salt and pepper

Directions:
Preheat oven to 450 F. Place a wire rack on a baking sheet lined with aluminum foil and spray with cooking spray.

To make the salsa, combine the mango, onion and jalapeno in a small bowl. Drizzle with the honey and the vinegar and toss to coat. Season with salt and pepper. Chill until ready to eat.

Mix the cornmeal and flour in one shallow bowl and the egg white in another. One at a time, dip the tilapia into the egg white and then the cornmeal mixture, patting to adhere. Place the tilapia on the wire rack. Sprinkle 1 tbsp parmesan cheese on top of each fillet. Bake for 10-15 minutes until cooked through.

Serve the fish topped with the mango salsa.

Serves 2.


Wednesday, July 4, 2012

Breakfast Sandwiches on Buttermilk Biscuits

Happy 4th of July! Happy birthday, 'a-Mer-ca!

What did you do this morning? Did you sleep in? Did you roll out of bed and head straight to the pool or beach? Did you starting making food for your cookout this evening?

Oh, what did I do?

Thanks for asking.

I slept in a little bit and then made a good American breakfast to celebrate our nation's birthday. As you may have guessed from my a-Mer-ca, I went Southern with my cooking-- buttermilk biscuits with egg, cheese and bacon. I adapted Alton Brown's recipe for buttermilk biscuits subbing in half whole wheat flour; you may think I did this to make these healthier and go ahead think that, but the real reason is that I didn't have a full two cups of all-purpose flour. Sometimes whole wheat flour can add density and I was a little worried the biscuits wouldn't be quite a fluffy as expected. However, they turned out great! And perfect vehicles for the eggs, bacon and cheese.

Go all out and make this sandwich, or make it your own and use sausage or ham (or Canadian bacon, but pretend I didn't suggest this on a-Mer-ca day). Or just skip the meat altogether and add some cooked portabella mushrooms or spinach for a hearty vegetarian breakfast. Alternatively, I think the biscuits would be perfect as a side to a soup or salad for lunch or dinner... I'll probably be doing that later in the week since I have 10 fluffy biscuits sitting in my kitchen right now.

Well, enjoy these and your 4th of July celebrations!


Egg, Cheese and Bacon Biscuits
Ingredients:
1 egg
3 tbsp egg white substitute (or another egg)
2 slices bacon, cooked to your desired crispness
2 tbsp shredded sharp cheddar cheese
2 buttermilk biscuits (recipe below)

Directions:
Beat the egg and egg white in a small bowl. Heat a small skillet to medium heat. Add the egg and season with pepper (you probably won't need more salt since there is plenty of salt that comes along with the bacon). Cook, without stirring, until the eggs are cooked almost through. Flip over and cook the other side (it may be easier to cut the egg patty in half before flipping). Once the eggs are cooked through, fold the egg into two pieces that are around 2-2.5 in round.

Split the biscuits in half. Add one half of the eggs to the bottom half of each biscuit, top with approximately 1 tbsp cheese and 1 slice of bacon, broken in half. Top with the other half of the biscuits.

Makes 2 small biscuits (serves about 1 person depending on your appetite).


Whole Wheat Buttermilk Biscuits (adapted from Alton Brown)
Ingredients:
1 cup all-purpose flour
1 cup whole wheat flour
4 tsp baking powder
1/4 tsp baking soda
1/2 tsp salt
4 tbsp cold butter
1 cup cold buttermilk

Directions:
Preheat oven to 450 F.

Combine the flours, baking powder, baking soda and salt in a large bowl. Cut in the butter using a pastry cutter or two knives until a crumb-like texture is formed. Add the buttermilk and mix until the dough is moistened and sticky.

Turn out onto a lightly floured surface and dust the dough with a small amount of flour. Gently fold over the dough on itself about 5-6 times. Using your hands, press the dough into a round with about 1/2 in thickness. Cut into approximately 2 in round pieces (either use a round cookie cutter or eyeball it with a knife). Reshape the dough and repeat until you have used up all the dough. Make sure not to handle and knead the dough too much or the biscuits will not be fluffy.

Place approximately 1 in apart on a baking sheet. Bake for 15-20 minutes until lightly golden.

Makes 12 biscuits.


****Please note that I have added a few things to the blog. On the right hand side, under pages there is a link to "Recipe Archives". I have classified the recipes under various headings so you can search as you would like and link to particular posts. I will keep this up-to-date as I add new recipes.

Additionally, if you are on Pinterest and would like to follow my pins, please click the "follow on Pinterest" button to the right.****

Tuesday, July 3, 2012

Bacon, Fried Green Tomato and Pimento Cheese Sammy

During my first year of grad school, our go-to bar was this great place, Tyler's Taproom. It has pool, a few televisions, foosball, and best of all, A LOT of beer choices. There is a wall (actually two) that is full of taps as well as lots of assorted bottles. They have lots of seasonal and unique flavor profiles. Unfortunately, the food at Tyler's was only okay; they had a few good burgers, but it really wasn't even that good. After awhile, we stopped frequenting Tyler's and would only go for birthday or defense celebrations. Imagine my surprise when in my last year of grad school, I discovered that they had revamped their menu significantly. They added a number of new and interesting sandwiches and entrees. One of them representing the south in every bite- a pimento cheese and fried green tomato BLT. This weekend I set out to curb my craving for this sandwich (unfortunately I couldn't make the trip to Durham), by recreating it in my kitchen. 

In my opinion, a great sandwich should be gooey, messy and above all, delicious. This will not disappoint. Let me introduce you to the players for our sandwich today:


The bread is the vehicle for all the goodness. This seeded sourdough bread I got from a local bakery was perfect as the base. Next, you need crispy bacon- none of that flimsy, greasy stuff (what do you think this is? an all-night diner?). And, of course, the stars of the show, the pimento cheese and the fried green tomatoes. 

I'm going to assume you know how to pick up some bread from the store (or make it yourself) and microwave/bake yourself some super crunchy bacon. I'll focus here on the recipes for the pimento cheese and the FGT. 

I lightened the pimento cheese by subbing Greek yogurt for some of the mayo. It is so yummy that I won't judge you if you eat it on top of some celery or mini bell peppers (side note: I'm obsessed with those mini bell peppers right now. Perfect for salads or perfectly snackable!).

The FGT are really baked green tomatoes, but that just sounds silly. The green tomatoes are sour and complement the cheese and bacon perfectly. The crust was crunchy and not too heavy. I ate one by itself and I think I would have preferred to dunk it in some ranch. I think these work great for a sammy but I'm not sure I would recommend eating them without additional flavoring. You could certainly step up the breading with some chili powder or cumin or even some shredded parm if you wanted to play around with FGT in order to eat them plain.

On to the good stuff. Doesn't that just look AMAZING?!?! 


If you're going all out Tyler's style, serve them alongside some good and garlicky french fries as I did. And don't plan on kissing anyone right after dinner. ;)


Pimento Cheese (adapted from Rachael Ray Magazine July 2012)
Ingredients:
1 1/2 cup shredded sharp cheddar cheese
1 tbsp diced onion
1 1/2 tbsp light mayo
1 1/2 tbsp Greek yogurt
2 tbsp chopped pimentos
1 tsp cider vinegar
1/2 tsp paprika

Directions:
Add all ingredients to a bowl and mix until combined completely. Chill until ready to serve.


Baked "Fried" Green Tomatoes (adapted from A Veggie Adventure)
Ingredients:
1/8 cup wheat flour
1/8 cup yellow cornmeal
1/2 tsp kosher salt
1/4 tsp black pepper
1/2 tsp sugar
1/4 tsp paprika
1/2 cup buttermilk
1 large green tomato, core removed and cut into 1/3 slices

Directions:
Preheat oven to 400 F. Place a baking sheet in the oven as it is heating to get it hot.

Stir together the flour, cornmeal, salt, pepper, sugar and paprika in a shallow bowl. Add the buttermilk to a different shallow bowl.

Remove the baking sheet and spray with cooking spray. Working quickly, dip each tomato slice into the buttermilk and then into the breading, shaking off excess. Arrange on baking sheet.

Bake for 30 min, flipping once at the halfway point.


Bacon, FGT, and Pimento Grilled Cheese (Inspired by Tyler's Taproom)
Ingredients:
1/3 cup pimento cheese (see above)
2 slices FGT (see above)
2 slices of good quality sourdough (or other bread of choice)
3 slices of crispy cooked bacon
~1/2 tbsp butter or margarine

Directions:
Heat a frying pan on medium heat.

Spread approximately 1/4 tbsp of butter on one side of each piece of bread. On the opposite side of one piece of bread, spread the pimento cheese. Stack on the FGT and then the bacon. Top with the other piece of bread, butter side out.

Add the sandwich to the heated pan, butter side down (put the slice with the pimento cheese on it as the bottom piece), cover sandwich with a lid, and cook until browned, approximately 2 min. Carefully flip over and cook the other side until browned, approximately 2 min.

Remove from the heat and consume! :)