Monday, December 24, 2012

Mini Gingerbread Men (and others!)

Did you ever have those gingerbread men cookies that were covered with some granulated sugar from the bins at the grocery store? I used to love those; the thick and crunchy perfection of cookies. I think it was the memory of those cookies that made me really want to make gingerbread cookies this year. When I came across this recipe in my Cooking Light Holiday edition, I figured I should try them out. The original recipe called for a combination of golden cane syrup with molasses but since I couldn't find the syrup in my grocery store, I upped the molasses slightly and subbed in some corn syrup. They are probably not as "light" anymore, but they did turn out well.


They are quite the crunchy thick cookies I was imagining, but even the non-gingerbread lovers will enjoy the flavor. The ginger isn't over the top and if you use 1-inch cookie cutters like I did, you'll get bite-sized goodness that is just enough.


Gingerbread Cookies (adapted from Cooking Light December 2012)
Ingredients:
For cookies:
2 1/2 cups all-purpose flour
1 tbsp ground ginger
1 tsp baking soda
1/4 tsp ground cinnamon
dash of salt
3/4 cup packed dark brown sugar
1/2 cup unsalted butter, softened
3 tbsp light corn syrup
3 tbsp molasses
1 large egg

For frosting:
2 cups powdered sugar
1 tbsp meringue powder
3-5 tbsp water (more or less to thin as desired)
green and red food coloring

Directions:
Preheat oven to 350 F. Cover baking sheets with parchment paper.

Combine the flour, ginger, baking soda, cinnamon and salt in a bowl. Whisk well to mix.

Beat the brown sugar and butter in a large bowl with a mixer at medium speed for 3-4 minutes until light and fluffy. Add the corn syrup, molasses and egg and beat until combined, about 1 minutes. Add the flour mixture and stir using a wooden spoon until just combined. Form into a ball with your hands and wrap in plastic wrap. Chill in fridge for at least 30 minutes.

Divide the dough in half. On a lightly floured surface, working with half of the dough at a time, roll to a 1/8-inch thickness. Use cookies cutters to get the desired shape and cookies, rerolling to dough as necessary. Continue cutting until you have used almost all the dough, placing the cookies on the prepared baking sheets.

Bake for 8-10 minutes, until lightly browned. Let cool on the baking sheet for about 5 minutes and then remove and let cool completely.

Prepare the icing by beating the powdered sugar, meringue powder and about 3 tbsp water in a large bowl on low speed until the sheen has disappeared. Separate into two bowls and color with red and green food coloring, adding more water as necessary. Spoon into disposable pastry bags fitted with size two round tips. Pipe on to cookies in desired designs.


Friday, December 21, 2012

Tofu Peanut Stir Fry

Are you looking for something easy and light amongst on all the goodies this holiday season? Then look no further. Here I made a tofu stir fry full of vegetables set atop some noodles. The peanut flavor is reminiscent of Pad Thai but since I just winged it, it's not exactly the same. As I always say with tofu, you have to make a nice sauce to get it flavorful, and I think that is just what I've done here.

So set aside your cookies, cheese and crackers, bread, and decadent holiday dishes for a night and make this. Your waist line with thank you ;)


Tofu Peanut Stir Fry
Ingredients:
For marinade:
1/2 tbsp corn starch
1/2 tbsp soy sauce (low sodium, preferred)
1/2 tbsp mirin
3 oz extra firm tofu, cut into bite sized pieces

For stir fry:
1 tbsp soy sauce (low sodium, preferred)
1/2 tbsp creamy natural peanut butter
1/2 tbsp mirin
1/2 tbsp hoisin sauce
1/2 tbsp corn starch
1 tsp Sriracha sauce
1/2 cup chicken broth
1 tbsp peanut oil
1 scallion, sliced thinly, whites and greens separated
1 garlic clove, minced
1 tsp fresh ginger, minced
pinch of sugar
1 1/2 oz somen noodles
1 cup broccoli slaw
4-5 mini sweet peppers, sliced thinly
4-5 button mushroom, sliced thinly
peanuts, for garnish

Directions:
Mix together corn starch, soy sauce and mirin and toss the tofu in it. Refrigerate until ready to stir fry.

Prep all of your vegetables and set them close to the stove.

Whisk together the soy sauce, peanut butter, mirin, hoisin sauce, corn starch, Sriracha and broth. Set aside.

Heat 1/2 tbsp oil over medium heat in a wok. Pour off any excess marinade and then add the tofu to the pan. Cook, flipping gently, for 3-4 minutes until browned. Remove to a plate and wipe out the wok.

Bring a pot of water to a boil. Add the noodles and cook for 2-3 minutes, until cooked through. Drain.

Heat another 1/2 tbsp oil over medium high heat in the wok. Add the white of the scallion and the garlic; cook until softened, about 1 minute. Add the ginger and sugar and cook for 30 seconds. Add the mushrooms and peppers and cook, stirring constantly, for 2-3 minutes until softened. Add the broccoli slaw and cook for an additional 2 minutes. Add back the tofu, sauce and noodles. Mix completely and heat until thickened.

Serve garnished with the greens of the scallion and peanuts.

Serves 1-2.


Wednesday, December 19, 2012

White Almond Bark Chex Mix

This is a Christmas cookie tray staple at my house... and it is probably my favorite Christmas treat ever! Oh my, it is so addicting that I could eat an entire bowl in an evening and feel sick later in the night, just to consume more the next day. That is why whenever I start a new job, I always make it for my new coworkers. It is soooo easy to scale up to however many people you need to give treats to and it takes no time at all.


There is one kitchen utensil (?) that is essential in making this: you must have a large glass or ceramic bowl (I recommend this Pyrex 4 quart bowl). The key is to use a bowl that conducts heat. You will have a lot of trouble if you use a plastic bowl; take it from my difficult experience in grad school. A bowl that retains the heat will allow you to stir everything and get them nice and coated before the bark starts to solidify again.

Please forgive my fail of purchasing normal peanut M&Ms instead of holiday ones. I do not know where my head was... For a Christmas effect, just use green and red M&Ms.

Also, please forgive my lack of "amounts" in the directions. This is really a pour, mix and observe type of a recipe. This year I used two 24-oz packages of white almond bark, a full 8-oz box of cheerios, almost a full 12.8-oz box of rice chex, almost a full 15-oz bag of pretzels and two 12.6-oz bags of peanut M&Ms. It made lots. I filled up the 10 bags above with about 3 cups each plus a larger tin and two quart sized ziploc bags (not including everything I stuffed in my mouth while I was making it ;)).


White Almond Bark Chex Mix
Ingredients:
Rice Chex
Cheerios
Pretzels
Peanut M&Ms
White Almond Bark

Directions:
Working with half of the brick of almond bark at a time (if you have a really big bowl you could probably use it all), heat in microwave for 90 seconds in a glass bowl. Remove and stir. If it is not completely melted, microwave for another 15 seconds. Stir and repeat if necessary.

Add 1-2 cups of chex, 1 cup cheerios, 1-2 cups pretzels and 1 cup M&Ms. Gently mix using a large spoon trying not to crush the cereal or pretzels. Add additional chex, cheerios, pretzels and M&Ms if you have still have melted bark that has not coated everything.

Spread out on wax paper and allow to cool.

Break into pieces and devour. Or package into pretty bags or tins to hand out. Store in airtight containers at room temperature.


Tuesday, December 18, 2012

Sweet Potato and Peanut Tomato Soup

You guys, can you believe that it is one week until Christmas?!?!

I am definitely in the holiday spirit! I've found a Christmas station on the radio (which is a hard thing to do when you're celebrating your first holiday season in a new city), I've done a bit of baking and packaged up treats to give to my co-workers (you'll see that recipe tomorrow!) and my shopping is almost all done. I have even already wrapped most of my presents (this is the beauty of not having to fly home). Now I'm just counting the hours until I'm on vacay. ;)

The weather has finally reached winter temperatures and that has gotten me in the mood for comfort food in the form of soup. This past weekend I made this delicious creamy soup. Spoiler alert- it contains no cream! Which means that it is a LOT healthier than most cream-based soups. Instead, it is the combination of the pureed sweet potato and the peanut butter that gives that creamy feel. The flavor is reminiscent of tomato soup with an extra kick from the chilies and of course the peanut taste is prominent as well. It is almost like a Thai-inspired tomato soup. It tasted great the first day but may have been even better after flavors had time to meld in the fridge and I reheated it for lunch the next day.

Note that I used homemade vegetable broth (that contains no salt) and no salt added tomato juice. This allowed me to adjust the seasoning as I desired (and avoid excess sodium). Even if you purchase low-sodium broth and juice, you will certainly not need to add an entire tsp of salt. Make sure to taste and season!


Sweet Potato and Peanut Tomato Soup (adapted from Eating Well)
Ingredients:
3 medium sweet potatoes
1 tbsp peanut oil
1 small onion, chopped
2 garlic cloves, minced
2 tsp fresh ginger, minced
3 cups tomato juice, no salt added
4 oz can chopped green chilies
1 tsp ground all-spice
2 cups vegetable broth (homemade or store bought)
1/2 cup smooth natural peanut butter
1 tsp salt, plus more to taste
freshly ground pepper, to taste
chopped peanuts, for garnish
chopped fresh parsley, for garnish

Directions:
Rinse and wash the sweet potatoes. Prick them with a fork multiple times. Place them in a microwave safe container and microwave on high for 7-10 minutes until soft and cooked. Allow to cool.

Meanwhile, heat the oil over medium heat. Add the onion and cook for 2 minutes until softened. Add the garlic and cook for another 1 minute. Add the ginger, tomato juice, chilies and all-spice. Bring to a boil, lower heat and simmer for about 10 minutes.

After potatoes have cooled, peel them and chop into bite sized pieces. Add half of the chopped potato to the pot. Combine the remaining half with the vegetable broth and peanut butter in a food processor. Pulse until smooth. Mix into the pot on the heat. Add the salt and pepper, tasting and adding additional if you desire. Simmer for at least 5 minutes to heat through (you can keep it on the heat for longer if you want).

Serve garnished with chopped peanuts and fresh parsley.

Serves 4-5.


Monday, December 17, 2012

Fudge Covered Cookie Bars

I have discovered a new Pandora station that I'm loving right now- The Pitch Perfect soundtrack. It is lots of acapella music and Glee songs interspersed with some current pop music. It is perfect for data analysis in lab as well as cookie baking and Christmas card addressing at home. Truth be told, it makes me want to get up and dance. That is perfectly acceptable in the comfort of my own home but probably not the best idea for work. ;) 


Anyway, one of the things I made while dancing rocking to this station was these cookie bars. I was inspired by these chubby hubby cookie bars that sounded delicious and just looked beautiful. However, I decided against purchasing the malt powder and wanted to skip the peanut butter drizzle if case anyone I was sharing with had a peanut allergy. I chose instead my go-to chocolate chip cookie recipe in bar form, topped with the delicious chocolate-y fudge and garnished with chocolate covered pretzels. You could certainly skip the pretzels, but I would suggest sprinkling the top with a little kosher salt because the salty sweet combo is what really makes these bars. They would be any easy addition to any cookie platter this season because you can skip the rolling or dropping of individual cookies; just spread it into your pan and go from there.


Fudge Covered Cookie Bars
Ingredients:
For cookie bar (adapted from Better Homes and Garden Cookbook)
3/4 cup unsalted butter, softened
1/4 cup shortening
1 cup packed light brown sugar
1/2 cup granulated sugar
3/4 tsp baking soda
dash of salt
2 large eggs
1 tsp vanilla
2 1/2 cups all purpose flour
6 oz mini semisweet chocolate chips

For topping (adapted from Shugary Sweets):
14 oz can sweetened condensed milk
2 tbsp unsalted butter
12 oz milk chocolate chips
30-40 chocolate covered pretzels (such as Flips)

Directions:
Preheat oven to 375 F. Line a 9x13 pan with parchment paper.

Beat the butter and shortening in a large mixing bowl with an electric mixer for about 30 seconds on medium high speed. Add the brown sugars, baking soda and salt and beat until combined well. Add the eggs and vanilla and beat until combined. Beat in as much flour as possible with the electric mixer. Change to a wooden spoon and stir in the rest of the flour. Mix in the mini chocolate chips.

Press the dough into the prepared pan. Bake for 15-20 minutes until golden.

Make the topping by heating the sweetened condensed milk and unsalted butter over medium low heat until melted and warmed. Stir in the milk chocolate chips. Pour the topping over the cookie bars when they come out of the oven, using a spatula to spread evenly. Place the chocolate covered pretzels evenly on top of the fudge layer, pushing in so that they stick well. Cool completely.

Refrigerate for at least 2 hours (or overnight) until cold. Remove from the pan until the parchment paper to pull out. Cut into squares.


Sunday, December 16, 2012

Cheese Stuffed Buns

"The best way to spread Christmas cheer is singing loud for all to hear."

"Buddy the elf, what's your favorite color?"

"We elves try to stick to the main four food groups- candy, candy canes, candy corns and syrup."

"Smiling's my favorite."

"You smell like beef and cheese. You don't smell like Santa."

"Fran-sis-co."

"CONGRATULATIONS! World's best cup of coffee."

"Watch out! The yellow ones don't stop."

"SANTA'S COMING! I KNOW HIM!."

"What's a Christmasgram? I want one!"


Guess what I did yesterday? You got it- I watched one of the greatest holiday movies ever- ELF. I love it. Will Ferrell is so funny and now I'm officially in the Christmas spirit. :)


I also made these delicious cheese stuffed buns. They are soft and chewy full of melty cheese and a hint of garlic. Perfect straight out the oven, or even reheated the next day. You should add them to your holiday plans; the oven will be on for cookie baking anyway, right? Feel free to use whatever cheese you want but you certainly don't want to miss out on these.


Cheese Stuffed Buns (adapted from Heather Christo Cooks)
Ingredients:
1/2 cup hot water (110-115 F)
1 tsp sugar
1 tsp instant yeast
1 tsp garlic powder
1 tsp salt
1/8 cup extra virgin olive oil
1 1/2 cups all purpose flour
4 oz monterey jack cheese, cut into 8 equal cubes
1 1/2 tbsp unsalted butter, melted

Directions:
Combine the hot water, sugar and yeast in a medium to large bowl. Allow to stand until bubbly, about 5-10 minutes. Add the garlic powder, salt and oil; mix. Add in about 1 cup of the flour and mix. Turn out onto a clean surface and knead in the additional 1/2 cup flour. Continue to knead for 5-6 minutes until it is a smooth soft dough. Place in a lightly greased bowl and cover with plastic wrap. Allow to rise until doubled, about 2 hours, depending on the temperature of your house.

Preheat oven to 375 F. Line a baking sheet with parchment paper.

Punch down the dough and divide into 8 equal pieces. Flatten each piece slightly and place a cube of cheese into the center. Close the dough around it and form into a ball. Place buns on prepared baking sheet. Brush with melted butter.

Bake for 10-12 minutes until golden on top. Remove and brush with more melted butter.

Serve hot.

Makes 8 buns.


Saturday, December 15, 2012

Mushroom Pizza (with homemade pizza dough)

Raise your hand if you like pizza.


So everyone has their hand in the air, right?


Me? I definitely enjoy pizza. I won't turn down a stuffed crust slice from Pizza Hut or a thin and crispy Dominos. That super thick Chicago style pizza? Delicious! New York floppy and greasy? I'd fold that baby in half and eat that too. $5 from Little Caesars? Pizza! Pizza! I say. I especially like local places with different pizza specials. Whether it be thick or thin, you'll bet your bottom dollar I'll eat it.


When you're living alone, ordering and consuming an entire pizza yourself is not the best idea. For that reason, and to play around with yeast some more, I started making homemade pizza dough. And I'm telling you, best decision of my (culinary) life! I have made the following dough at least three times since I've lived in IL and another time I made it with half whole wheat flour.


This dough is great for a couple reasons. One- it is very easy to put together. Two- it freezes beautifully. That means you can whip up the dough and freeze it into individual sized portions to use whenever you have a hankering for pizza. It works great for calzones and as a vehicle for any combination of toppings you can come up with. This week I went with a simple tomato sauce, shredded mozzarella cheese and mushrooms.

Just look at that cheese!


Homemade Pizza Dough (from Annie's Eats)
Ingredients:
1/2 cup warm water
2 1/4 tsp instant yeast
1 1/4 cup room temperature water
4 cups bread flour
1 1/2 tsp salt
2 tbsp extra virgin olive oil

Directions:
Combine the warm water and yeast in a small bowl. Let sit for a few minutes. Add the room temperature water and olive oil and mix. In a large bowl, mix together the flour and salt. Mix in the wet ingredients, stirring with a wooden spoon until you cannot stir anymore. Then turn out the dough on a floured surface and knead to mix in the rest of the flour. Keep kneading until the dough is smooth, about 5 minutes. Place it into a lightly greased bowl and cover with plastic wrap. Let rise until doubled, about 90 to 120 minutes (the timing will change depending on the temperature of your house).

Lightly punch down the dough. Separate into 5* equal pieces. Form each into a ball. Wrap in plastic wrap, place in a freezer safe bag, and freeze until ready to use.

*The 5 portions will give you individual sized pizzas, if you want to do large family style pizza, separate the dough into 2 portions.


Personal Mushroom Pizza
Ingredients:
1/5 of pizza dough (from above)
1/3 cup tomato pizza sauce
1/2 cup shredded mozzarella cheese
1/2 cup sliced mushrooms
cornmeal

Directions:
If your dough is frozen, thaw in the fridge over the course of the day.

Preheat oven to 500 F. Place a baking stone or upside down baking sheet in the oven during the preheating process.

Remove the dough from the fridge (or use non-frozen dough from above). Place the ball on a clean surface and cover with a damp cloth. Let sit for 10-30 minutes while the oven reaches temperature. Prep your pizza sauce, cheese and mushrooms.

Stretch the dough into a flat shape. Remove the baking sheet or stone from the oven and sprinkle with cornmeal. Place the dough on top of it and moving quickly spread your sauce over most of the dough. Top with the cheese and mushrooms.

Bake for 7-8 minutes until crust is golden and cheese is hot.

Serves 1.


Tuesday, December 11, 2012

Mexican Shrimp Bisque

I love a soup. Or a stew. Or a chili.

Maybe it is the fact that you get to eat it with a spoon so you have an excuse to literally shovel into your mouth. Maybe it is because they make me feel so warm inside. There's just something so comforting about a pipin' hot bowl of soup, am I right?

The crockpot is a great place to make soups and stews, but when it comes to a creamy bisque, you've got to make it on the stovetop. You want to avoid any milk or cream curdling because nothing says "let's call for pizza" like curdled soup. Eww... why are we talking about this? Bad thoughts to put into your mind when you are getting ready to make this incredibly flavorful Mexican shrimp bisque that is simple enough to put together any day of the week.


The cumin and chili powder give it loads of flavor and the shrimp are cooked to perfection. Top it off with a cooling dollop of sour cream and some avocado and you are set to go. The recipe makes two main dish portions but I'm certain it would work just as well if you increased all the quantities.


Mexican Shrimp Bisque (adapted from Taste of Home: The Ultimate Soup Cookbook)
Ingredients:
1 tbsp extra virgin olive oil
1 small onion, diced
2 cloves of garlic, minced
1 tbsp flour
1 cup vegetable broth (homemade or store bought)
1/2 cup half and half
1 tbsp chili powder
1 tsp ground cumin
1/2 tsp ground coriander
1/2 lb shrimp, peeled, deveined, and coarsely chopped
1/2 cup low fat sour cream
additional sour cream and diced avocado, for garnish

Directions:
Heat the oil over medium heat in a medium saucepan. Add the onion and saute until tender, about 3-4 minutes. Add the garlic and cook for another minute. Sprinkle the flour on top of the vegetables and stir to coat. Whisk in the vegetable stock and half and half. Add the chili powder, cumin and coriander and mix to combine. Bring to a boil. Reduce the heat to low, cover, and simmer for 5 minutes. Add the shrimp to the soup and simmer for an additional 5 minutes until the shrimp are cooked completely.

Put the sour cream in a heat proof bowl. Ladle approximately 1/2 cup hot soup into the sour cream and mix thoroughly. Slowly pour the sour cream mixture back into the pan while whisking constantly. Heat through, without boiling.

Serve topped with additional sour cream and diced avocado.

Serves 2.


Monday, December 10, 2012

Mint Oreo Truffles

Do as I say, not as I do.

For example, if you are spending the weekend baking for a holiday party make sure you eat something other than the sweets you are cooking. And whatever you do, do not eat sweets accompanied by wine on Friday night followed by more sweets on Saturday morning alongside your coffee. Your tummy will not like you very much.


You should, however, add Oreo truffles to your Christmas candies and cookies this year. FOR CERTAIN. You will love them (and inevitably consume too many). Everyone you share them with will love them too. They don't really take any extra prep time than cut-out cookies so you can definitely fit them in. They are super adaptable if you don't like mint, just use regular Oreos or I bet the peanut butter ones would be delicious too. You could totally use the golden ones and coat them with chocolate. Wowsers.


So what are you waiting for? Get out to the store and get the supplies and get rolling and dipping. Turn up some "All I want for Christmas is You" and the time will fly by.

Get in there and take a nice big bite!


Mint Oreo Truffles (I cannot even give this one source because they are all over the internet)
Ingredients:
1 package mint stuffed Oreos
8 oz block of cream cheese (it is okay to use 1/3 less fat), cut into 1-2 inch cubes
White almond bark, approximately 2/3 of a 24 oz package
crushed candy canes
Christmas colored sprinkles

Directions:
Place the Oreos into your food processor and pulse until they are finely ground. Place the cubes of cream cheese into the food processor and pulse again until mixed completely. Make sure you do not have any streaks of cream cheese left. It should form a nice black ball.

Place the Oreo mix into the fridge until you are ready to start rolling (it helps if it is slightly cold). Cover a baking sheet with parchment or wax paper. Roll the Oreo mixture into balls of about 1 inch diameter. Place on the prepared baking sheet.

Freeze the baking sheet with the balls for at least 1 hour.

Melt the white almond bark in the microwave in a glass bowl according to the package (usually zap for 90 seconds first, then stir and microwave for 10-15 seconds again until completely melted).

Roll each Oreo ball in the white almond bark and place back on the parchment. Top with candy canes or sprinkles, as desired (make sure you do this as soon as you finish coating in each one before the bark hardens again). If the uncoated balls begin to soften, place them back into the freezer for another 15 minutes to harden again before you finish up coating. Once you are all done with the coating, store the balls in the freezer or fridge until ready to serve.


Friday, December 7, 2012

Turkey Enchiladas

I apologize for all the turkey recipes.

I'm actually done with all the leftover turkey in my house, but I have this ONE LAST recipe to share with you regarding what to do with your extras from Thanksgiving. Of course, you may already be done with your turkey and that is ALL GOOD. You can definitely sub in some CHICKEN for ANY of these recipes. So please bear with me for this last post and next week we'll be on to different things like COOKIES, SOUPS and other delights.


Why am I typing in ALL CAPS for SO MANY words today? Who knows? You just do the things that feel RIGHT. Am I right?


Let's talk about these enchiladas. I got it in my mind that I was going to make turkey enchiladas even before I left for Thanksgiving weekend. I saw this recipe and feel in LOVE. Just think, a spicy sweet cranberry tomato sauce smothered over deliciously filled tortillas. Yum! However, we didn't have any leftover cranberry sauce because we DEMOLISHED it in a blink of the eye. I debated purchasing a can or just making some more, but I decided instead to adapt my go-to red sauce enchiladas to incorporate the leftover turkey. Sooo YUMMY. Totally works with CHICKEN too. ;)


Turkey Enchiladas (adapted from Annie's Eats)
Ingredients:
1 tsp canola oil
1 medium onion, diced
1 jalapeno, diced (include however many seeds you want for your spice threshold)
2 garlic cloves, diced
2 tbsp chili powder
2 tsp ground cumin
1/2 tbsp granulated sugar
15 oz can tomato sauce
1 cup turkey stock (or vegetable broth)
1 cup grape tomatoes, quartered
1 1/2 cups chopped cooked turkey
2 cups shredded cheddar jack cheese
1/4 cup chopped fresh parsley, plus more for garnish
10 8 inch corn tortillas

Directions:
Preheat oven to 400 F.

Heat the oil over medium heat in a large skillet. Add the onion and jalapeno and cook until they have softened, about 8 minutes. Add the garlic, chili powder, cumin and sugar and mix to coat the onion and pepper with the seasonings. Whisk in the tomato sauce, turkey stock and grape tomatoes. Bring to a simmer, lower the heat and cook until thickened slightly, about 5 minutes. Add the shredded turkey and mix to coat. Cook for about 5 minutes more.

Place a thin mesh strainer over a large bowl and pour the liquid into the strainer to remove all of the solids. Combine the turkey and vegetable mixture with 1/4 cup sauce, 1 cup of cheese and the chopped parsley. Mix well.

Spray a large baking pan with cooking spray.

Microwave the corn tortillas wrapped in a damp paper towel for about 1 minute so they are pliable. Add about 1/3 cup of the turkey mixture to the middle of each tortilla, roll up tightly and place in the baking pan. Pour the remaining sauce over the enchiladas. and sprinkle with the rest of the cheese.

Cover with aluminum foil and bake for 25 minutes. Remove the foil and bake for an additional 5 minutes until the cheese is bubbly.

Let cool slightly before serving. Garnish with sour cream and additionally chopped parsley.


Thursday, December 6, 2012

Turkey and Noodles

How to work-out when you are a chemistry postdoc (or graduate student):

Of course, you can go running outside, swim laps in a pool, or lift weights at the gym, but I want to share with you a number of fool-proof ways to stay "fit" while you're working in a lab.**

1. Make sure you join a lab that is NOT on the ground floor (the science they do is not that important-- the key is the location, location, location). It is particularly good if you can find a lab space that is on the 4th or 5th floor or down in the basement. Then make sure you walk up and down the stairs at least twice a day; especially when you are carrying your computer to and from work.

2. Utilize those same stairs if you need to run an instrument on another floor. For example, if you have 13C NMR time for a few hours and go back down and check it every hour or so. Your butt will thank you.

3. Find TWO full 4 liter bottles of solvent; place them in the nice rubber carrying cases. Perform bicep curls with them. Start with hexanes and move your way up to chloroform.

4. When you are stuck collecting fractions from a column (whether it be flash or HPLC or FPLC), do lunges and squats in front of your hood or instrument.

5. Fill up your ice bucket with 5 pounds of dry ice everyday. While you are walking back to lab, straighten your arms and lift up and down. Or over your head. Work all your different arm muscles.

6. Make sure when you are picking a parking lot for your car permit that it is at LEAST two to three blocks away from your building. You will have to walk back and forth everyday (once again carrying that computer).

7. Invest in lots of textbooks and the like. Stack them all up and carry them around when you walk about campus. Not only will you look smart, you'll be burning more calories.


Okay, now use up an extra turkey you still have in your fridge and make this turkey and noodle recipe. My mom always makes it after Thanksgiving, you should too!


Turkey and Noodles (Recipe from my Mom's kitchen)
Ingredients:
2 cups chopped or shredded roasted turkey
1 can cream of chicken soup
3 cups turkey stock (or chicken broth)
2 tbsp onion, diced (or 1 tsp dried minced onion)
6 oz Kluski egg noodles
salt and freshly ground pepper, to taste

Directions:
Whisk together the soup, stock and onion in a medium saucepan. Bring to a boil over medium high heat. Add the noodles, lower the heat, and cook for 5-6 minutes until they start to soften. Stir in the turkey. Continue to cook for 10-15 minutes until the noodles are cooked completely through. Season with salt and pepper to taste.

Serves 3.


**Disclaimer: I am not a registered trainer or even that fit, for that manner. Please perform all "work-outs" at your own discretion and with the utmost regard for safety in your own lab. ;)

Wednesday, December 5, 2012

Turkey Stock

Question--- what's the difference between stock and broth?

I did some googling (side bar: can you believe that google is in the dictionary as both a noun and a verb? Google wasn't even started until the late 1990s and now we use the word so often; it is crazy.) and found a few answers. First, I think in order for something to be a "stock", it needs to have been made with bones. But then how can there be vegetable stock? I dunno. Broth, on the other hand, is typically made with more meat pieces, salt and other seasonings that make it something you could eat directly from the pot. Most places that you look, however, say that chefs tend to use the words interchangeably, especially when they are homemade. Since I don't add any salt to either stock or broth, I wouldn't suggest eating them directly from the pot without seasoning. But regardless of what you call them, I would definitely encourage you to make them at home. My parents and I made this turkey stock on Thanksgiving because why throw away the carcass without getting a little something extra from it? Play around with the vegetables and seasoning and use what you have in your fridge (or even scraps from your freezer would work). Alternatively, just sub bones and skin from a chicken to make chicken stock.


Turkey Stock (adapted from Vegetable Broth)
Ingredients:
1/2 to full carcass of roasted turkey, plus skin
1 medium onion, cut into quarters
2-3 celery stalks, cut into large chunks
8-10 baby carrots
1 bay leaf
large handful of fresh parsley
4-5 fresh sage leaves
2-3 sprigs of fresh thyme
2-3 peppercorns
Cold water

Directions:
After you have carved your turkey and picked off most of the meat (you don't need to pick it clean, some meat will help to flavor it), break down the bones and add them plus any skin and fat to a large pot. Add all of the vegetables and seasonings. Cover with cold water. Turn on the stove and bring to a simmer. Reduce the heat to low and simmer for 3-8 hours.

Pour the liquid through a small mesh strainer and remove all of the solids. Let cool to room temperature (or you could cover it and put it outside if it is colder out there); you don't want to put it directly into your fridge because the heat will warm up the inside of your fridge and it may not be at the correct temperature for everything else you have in there. Once it has cooled to room temperature, place it in the fridge overnight. In the morning, skim off the fat using a spoon or fat skimmer (you can leave some fat if you would like, if you remove it all, you have fat free broth!). Portion into 1 cup and 2 tbsp (ice cube tray) aliquots and freeze.

Thaw and use in place of chicken stock or broth for whatever recipes you desire!

Remember when you use this that you will want to taste your dish and salt generously. Unlike the stock/broth that you buy in the store, this is salt free!


Tuesday, December 4, 2012

Hashbrown Waffles

It's beginning to look a lot like Christmas...


Only in the house
Take a look at the rain and gloom pattering on the pane
With temperatures at sixty and above
It's beginning to look a lot like Christmas
Sales in ev'ry store
Where the prettiest sight you'll see is the tree that you put up
In your own front room.


Please re-read that and sing it out loud to the tune of, you guessed it, "It's beginning to look a lot like Christmas".


Really isn't it crazy that the weather this week as been so nice?!? It was in the 70s on Sunday and Monday and now it is rainy and in the high 50s. This so feels like spring weather not DECEMBER.

Okay, let's just take a moment to FREAK OUT that it is the last month of 2012 already?!?! How in the world did that happen?!?! Why is life flying by in a blink of the eye?!? AHHH!


Okay, freak out officially over.

Well, until you make these hashbrown waffles. If you are on Pinterest, you have probably seem them floating around all over the joint. And if you are like me, you probably thought to yourself, wow what an amazing idea and how did I not come up with that? I love love love love love crispy potatoes and that is exactly what these are. Plus you get to use that waffle maker for something other than waffles. And it's so easy. I mean all you do is shred your potato, season and let it cook. Have I sold you yet?

So make these for breakfast, brunch or even dinner. You won't regret it (although you may freak out a little bit... oh, you don't freak out at the drop of a hat like me? Okay, then maybe you won't freak out. Just don't judge me and my freaking out nature...please...please...please...).


Hashbrown Waffles (from Teas and Cookies)
Ingredients:
1 potato (per person)
Salt (start at about 1/2 tsp per potato)
Canola oil
Optional: eggs cooked to order and ketchup

Directions:
Shred the potato using a hand grater or food processor. Wrap a towel around the potatoes and squeeze to remove the water (you want your potatoes to be as dry as possible to get crispy potatoes). Place the potatoes in a bowl and season with salt. Toss to mix.

Heat your waffle iron to hot. Carefully oil the top and bottom of the hot iron. Spread the potatoes over the bottom of the waffle iron and close. Cook for 10-20 minutes until brown and crispy. Remove from the iron and top with the egg and ketchup, if desired.


Monday, December 3, 2012

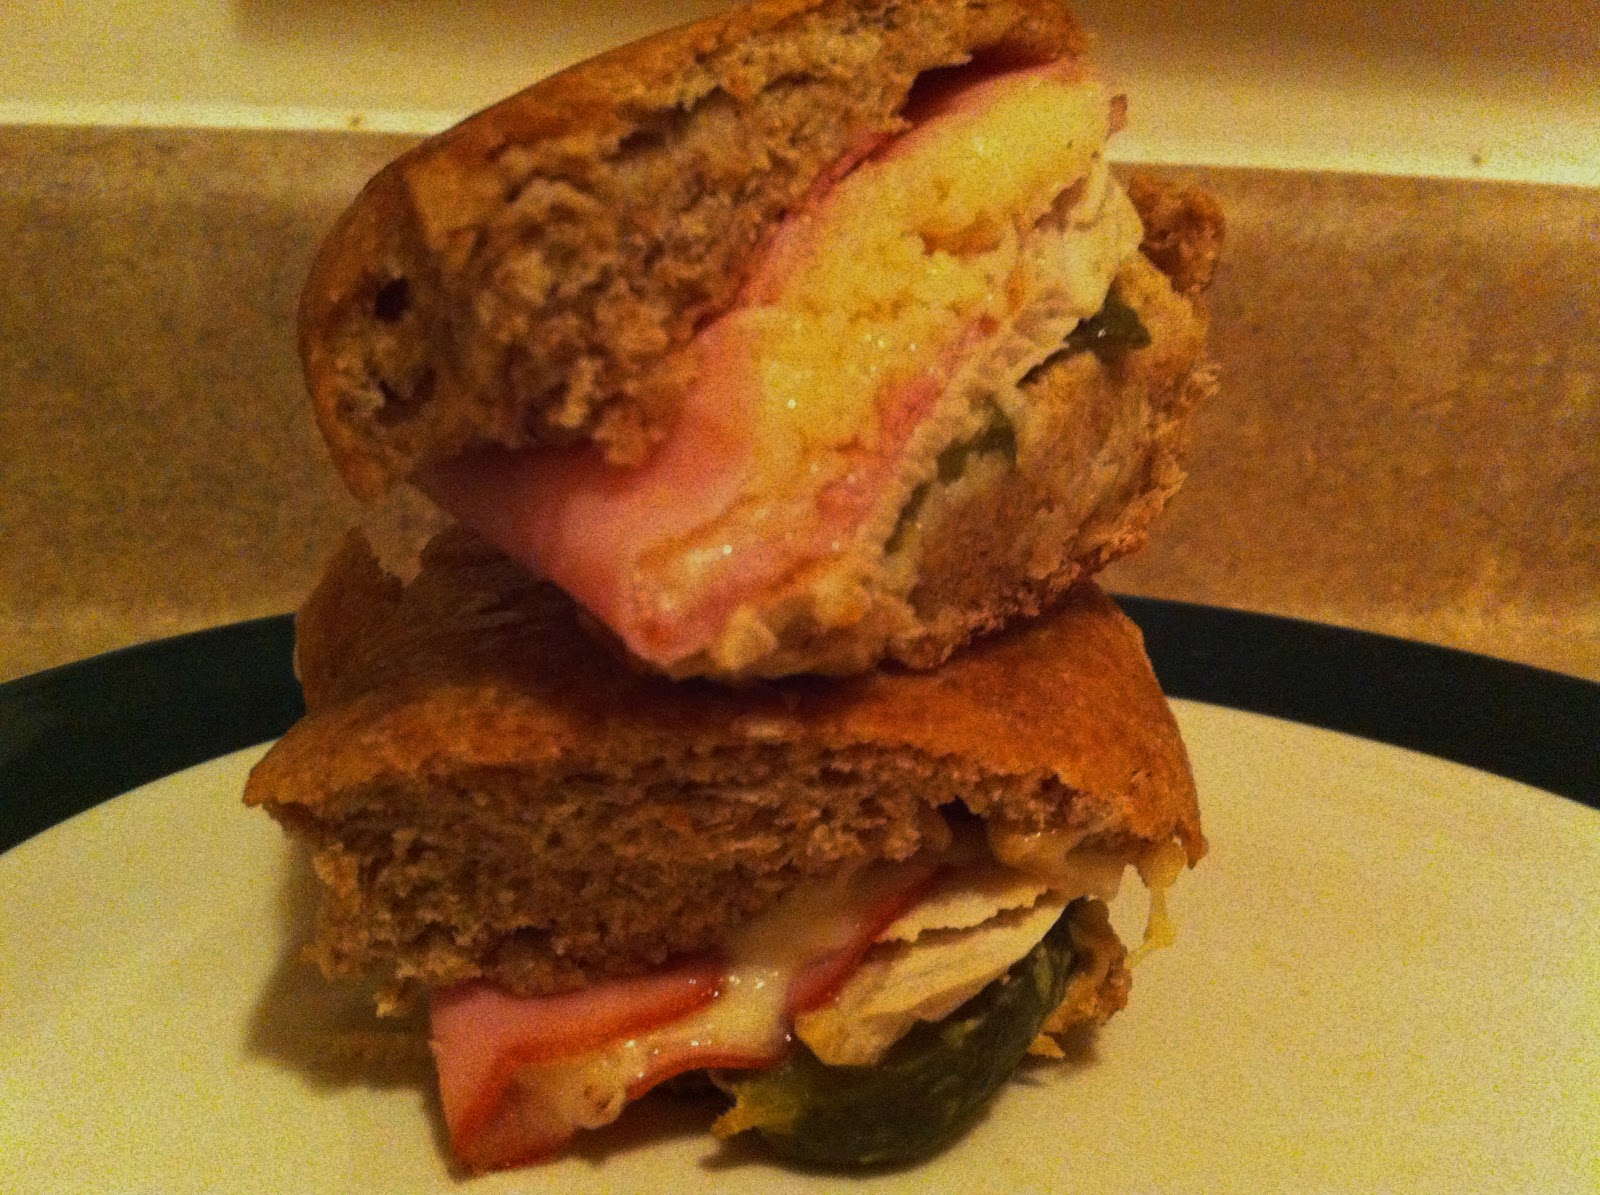
Turkey Cubano

Can I get a "holla" for the Blue Express on Duke's campus?

For those of you who cannot understand the words coming out of my mouth (or should I say the words I have typed on your screen), you are missing out. Well, kinda. Campus food can be hit or miss, right? Connected to the building where I spent many of my waking hours during grad school hidden in a basement lab was the Blue Express, one the campus's dining establishments. Every day of the week (and every week was the same) they had a sandwich special. My first year I liked the Wednesday schwarma. Then I learned to enjoy the Thursday gyro or the Tuesday portabello on pita. But the sandwich that defined the end of my graduate career was definitely the Friday cubano. Grilled to perfection and seasoned with dill pickles, mustard and mayo, the ham and pork sammy was the goodness of Friday lunch. I was typically (and still am) a "bring your lunch to work" gal, but when I didn't have a lunch for Friday this was certainly the go-to.

Anywho... this recipe is the Blue Express cubano re-purposed in IL and with ingredients I found in my fridge last week... I used left over turkey from Thanksgiving in place of the pork, went for shredded swiss, and a wheat baguette from my freezer.

Really it's the combo of the mustard and pickle that just makes the sandwich for me.

No, Julie, you should not eat a dill pickle dunked in mustard; that would be bad.


Turkey Cubano
Ingredients:
2-3 slices leftover roasted turkey
2 slices deli ham
1 thinly sliced pickle
1 tsp deli mustard
1 oz swiss cheese (shredded or sliced)
6 inch baguette (I used my homemade wheat baguette), sliced in half

Directions:
Preheat oven, or toaster oven, to 400 F.

Spread the mustard on one side of the baguette. Top with the pickle, turkey, ham and cheese. Wrap with aluminum foil. Bake for 15 minutes, until the cheese is melted.

Heat a large skillet (or panini press) to hot. Unwrap the sandwich and add to the hot pan. Press down with another large pan (or the top of the press) and cook for 2-3 minutes. Cut in half before serving.


Sunday, December 2, 2012

Butternut Squash, Broccoli and Spinach Mac and Cheese

I have this white board hanging in my kitchen where I always plan out my meals for the week. The planning out of weekly meals probably stems from my mom who has been making menus on the backside of her grocery list for as long as I can remember. This ritual of planning is important to me for several reasons:

First, I can avoid all of those unnecessary trips to the grocery store by only going once a week. This cuts back on impromptu purchases that can make a dent in the wallet. If the menu planning goes along with looking at the grocery ads, it can also save some additional cash.

Secondly, it helps keep variety in my life. You know me and my love of cooking magazines, cookbooks, and food blogs. By planning out my meals I can insure I have the ingredients I need to whip up something new and different each week. It is easy, if you don't have a plan, to fall into the rut of the same recipes day-to-day or week-to-week. For me, that just isn't fun.

Thirdly, it helps me to eat healthy. The stops by a fast food joint or the popcorn for dinner don't happen nearly as often if I am looking forward to my planned dinners. I always make sure to have enough veggies for a side salad or something of the equivalent to enhance my main dish.

Lastly, since I cook for myself, it allows me to plan out what to do with leftovers. Like if I'm going to make a butternut squash for ravioli then I'll most likely have leftovers. And what should I do with that extra squash? Well, make a nice mac and cheese, of course. I came across a delicious looking recipe that used sweet potatoes and spinach in a hearty mac and cheese dish. I adapted it significantly to utilize the butternut squash, add some extra vegetables (like broccoli) and changed up the cheese for my preference (and to use what was in my fridge). It worked out great, I tell ya!

So are you a menu planner? If not, I would suggest trying it out. You'll save some money, add some variety to your life, and maybe even eat a little healthier. What's on your plan for this week?


Butternut Squash, Broccoli and Spinach Mac and Cheese (significantly adapted from Naturally Ella)
Ingredients:
1 cup uncooked pasta (I used whole wheat rotini)
1 cup broccoli florets
1 handful fresh spinach
2/3 cup milk
2/3 cup butternut squash, cooked and mashed
1/2 tbsp butter
1/2 tbsp flour
1 garlic, minced
1/4 small onion, diced
1 oz cream cheese
1 American cheese single

Directions:
Preheat oven to 400 F.

Bring a pot of water to boil. Add the pasta and cook for about 4-5 minutes until almost done. Add the broccoli and boil for another 2-3 minutes. Finally add the spinach and cook for about 30 seconds. Drain the pasta and vegetables.

Meanwhile, melt the butter in a saucepan over medium heat. Add the garlic and onion and cook for 2-3 minutes until softened. Sprinkle in the flour and cook while stirring for 1-2 minutes. Whisk in the milk and cook until thickened slightly. Add the squash and cook until hot. Add the cream cheese and American cheese and stir until melted.

Pour the cheese mixture over the pasta and vegetables in a bowl. Toss to mix thoroughly. Pour into a baking dish. Bake for 25 minutes until hot and bubbly.

Serves 1.


Friday, November 30, 2012

Pumpkin Butterscotch Cookies

I like winter and colder weather for a few reasons. I enjoy wearing my slippers around the house and cuddling up with a blanket on my couch. I love the feeling of extra blankets on bed when I'm falling asleep at night. The being cold right before you get into a nice warm shower is just wonderful. Snow covered trees and bushes are breathtakingly beautiful.

But some of those reasons are also why I don't like the cold weather. Like being comfy and cozy on the couch doesn't make me motivated to wash dishes (actually not much makes me motivated to wash dishes). And the warmth of my bed in the morning does nothing for getting me up and going early in the day. My showers take longer because why would I want to leave the hot water? And snow has a tendency to turn to an ugly grey color that is not quite as admirable.


Ah well, winter is something you deal with (the good, the bad and the ugly) when you live in the Midwest. In the words of Master Stark "winter is coming" and we gotta drag out our boots, coats, hats, mittens and scarves.

If you want to warm up your house a little bit without turning the heat up, I would suggest some baking. I've got grand plans of cookies, bars, candies and the such this holiday season so stay tuned for recipes. And feel free to send me your address and then maybe you'll get a goody bag in the mail (because we all know I shouldn't eat all the treats I make). 

To start off holiday baking season, I'm sharing with you some pumpkin butterscotch cookies that I made for Thanksgiving. Since our Thanksgiving festivities were smaller in number of people this year, we decided to make only one pie-- apple, which is definitely my favorite. My mom wanted something pumpkin-y and she really enjoyed my last pumpkin cookie, so I figured we should give these a whirl. I had made them before (like back in the day before Pinterest and this blog) so I knew they would be good. They are a nice soft cookie that is bursting with flavor. The dominate flavor is definitely the butterscotch but your mouth is left with pumpkin and cinnamon goodness at the end. I would recommend them for any holiday cookie platter!


Pumpkin Butterscotch Cookies (adapted from Annie's Eats)
Ingredients:
2 cups all-purpose flour
1 1/2 tsp baking powder
1 tsp baking soda
dash of salt
1 tsp ground cinnamon
2 eggs
1 cup granulated sugar
1/2 canola oil
1 cup pumpkin puree (homemade or storebought)
1/2 tsp vanilla extract
1 cup butterscotch chips

Directions:
Preheat oven to 325 F. Line baking sheets with parchment paper.

Combine the dry ingredients (flour, baking powder, baking soda, salt and cinnamon) in a bowl.

In a larger bowl, gently beat the eggs with a whisk. Whisk in the sugar until light in color, about 2-3 minutes. Whisk in the oil, pumpkin puree and vanilla extract. Stir in the flour mixture with a wooden spoon until just incorporated. Gently mix the in butterscotch chips.

Drop mounds of the dough onto the prepared baking sheets. Bake for 14-16 minutes, rotating the sheets halfway through. Allow to cool slightly on the baking sheet and then transfer to a wire rack.

Makes 36-40 cookies of about 2-2.5 inch diameter.


Thursday, November 29, 2012

Wheat Rolls

Have you heard the good news?


The greatest show EVER is coming back; well, technically it is a whole new show but it is based on the child of two of the main characters and will have some of the same stars. You know what I'm talking about, right? BOY MEETS WORLD! Now we are going to have Girl Meets World!

Can you just imagine Cory Matthews, the first love of my life, as a father? And Topanga, she'll be the prettiest mom on the block. Any thoughts of whether crazy Uncle Eric will have settled down with a lovely lady? What about Grandma and Grandpa Matthews? Will be get to see Joshua all grown up? Will there be a third actress for Morgan? Oh and we could never forget Shawn, Angela or MR. FEENY.

FEENY!

           FEENY!

                   FEE-EE-EE-EE-EENY!


We'll see how it unravels. I, for one, cannot wait! Come on over, I'll make the bread (like these delicious wheat rolls we had for Thanksgiving) and we'll get watching a seven season marathon of BMW!


Wheat Rolls (from King Arthur's Whole Grain Baking)
Ingredients:
1 cup lukewarm water
1/4 cup orange juice
1/2 stick unsalted butter, cut into 6 pieces
3 tbsp honey
1 1/4 tsp salt
2 cups whole wheat flour
1 cup all purpose flour
1/2 cup instant dried potatoes (not cooked)
1/4 cup nonfat dry milk
2 1/4 tsp instant yeast
2 tbsp unsalted butter, melted, for topping

Directions:
Combine the water, orange juice, cubed butter, honey and salt in a large bowl. Begin to mix in the flours with a wooden spoon, but using your hands when the spoon no longer suffices. Knead the dough until you have a smooth dough, about 8-10 minutes. Place the dough in a lightly greased bowl and cover with plastic wrap; allow to rise until it is puffy about 2 hours (maybe less if your house is warmer than mine).

Lightly grease a 9 X 13 inch baking pan.

Gently deflate the dough and transfer it to a lightly greased countertop. Divide into 16 equal (or as close to equal as you can get) pieces. Roll each piece into a ball. Place the rolls into the prepared pan, making sure any seams are facing downward and spacing them evenly. Cover with lightly greased plastic wrap and allow to rise for about 2 hours. They will once again get puffy and end up touching each other.

Preheat oven to 350 F.

Remove the plastic wrap and bake until they are brown on top, about 25 minutes.* Remove from oven and brush with melted butter, if desired. Serve warm.

*If you are planning on freezing the rolls: I removed them from the oven, let them cool, covered them with foil and froze them. The day before Thanksgiving, I removed them from the freezer to let them thaw. To reheat, bake in a preheated 350 F oven for 8-10 minutes. Then brush with the melted butter.